Sunday, May 31, 2020

New seat from Russell Day-Long Seats

I have done quite a bit work with my seat comfort. The original seat of the facelift LT was just terrible for my behind. I got the "monkey butt" syndrome in less than 100 miles ride. BMW factory had listened their short legged customers and modified the seat narrower and also somewhat lower than in the -99-2003 models.

The first custom seat I had a chance to test was the Kontour seat which my LT colleague from Germany kindly sent me to try out. This seat was better than the original one but then I heard about the Russell Day-Long seats and figured that was the kind I needed. 
Russell needed a seat from the client to work with and they were located in California and I was in Finland. Sending seats back and forth over the Atlantic would have added the costs too much and luckily in autumn of 2005 I found on the classifieds of the BMWLT.com an early model seat set being for sale in Florida. I purchased the seats from this guy and he mailed both seats and the passenger backrest to Russell in California. I only had to mail my BakUp backrest from Finland for getting a matching upholstery.


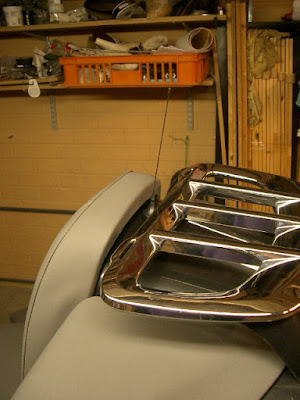
This was the seat design (picture taken from https://day-long.com/gallery/bmw/) that I chose for my bike. Russell was kind enough to send me their leather samples to choose from.

Before proceeding with the seat modifications Russell needed pictures of me sitting in riding position...

...and reaching my feet down. And also my measurements (height, inseam, weight.)


The seats arrived in the beginning of 2006 and they looked quite much different than my original seats...
...plus they were made in the frame of the earlier model LT which ment some extra work in fitting the seat in the newer model bike. 
One difference was the height adjustment bar. The new model seat is in the picture and the old model height adjuster is different. Also the seat base in the old model seat is thicker and thus occupies more space which was needed for the new model seat that was intended to sit lower.
 So in order to be able to fit the old model seat with thicker base, I needed to make more space under it. I extended the seat support. But now after 15 years I have a blackout...I don't remember how I solved the manual height adjustment. Judging from the old picture's dates I come to the conclusion that I never really solved it but I started designing the motorized height adjustment in the same winter 2005-2006. But this is another story... 
I decided to extend the seat support by some 20-25 mm

Here is the extended seat support from another angle.


Moving the trunk backwards and passenger backrest upwards


As most of the LT riders know the trunk has two factory positions. The factory setting is "forward" and this can easily be seen from outside by checking if the rear part of the trunk is flush with the rear light panel of the bike.
If you want to move the trunk backwards in the rearmost factory setting, remove the trunk liner and open the four bolts in the bottom of the trunk and move it backwards in the next holes. The difference between these positions is about 30 mm.
Well, I needed to go even further backwards with my trunk....


In this picture the trunk is moved another 30 mm backwards from the factory rearmost position.

The reasons for this project were:
1) My new hanging luggage rack needed upper fixing points for the supporting steel cables.
2) My motorized back rest adjuster eats up some space from my dear pillion so I needed to make some more space for her.


I used 40 x 5 mm flat steel bars. The reason for their excess length was this:


This steel bar gives extra support to my luggage rack. 


Here the new trunk supports are in place. The rearmost 6 mm threaded holes (for the trunk) are actually on the outside of  the rear panel. In this picture the luggage rack cable support bar is also in place but this part as well as the extra length is not needed if you only want to move the trunk backwards.
Here the extra luggage rack is in position but how this was made is another story...
Moving the trunk backwards gives one more bonus: It makes a nice storage space for my rain gear. But in order to have access to this space the passenger backrest must be moved upwards.

Here is the new storage space. In this picture the passenger backrest is already moved upwards since if that is not done, the lower edge of the backrest blocks the access to this compartment.


I simply drilled new holes some 20 mm higher than the original ones. And covered the old holes with black duct tape from both sides. This has worked since 2005...


One cannot really tell that the backrest sits higher.

And here is the view from the rear...


Here is my rain gear packed. Trousers, rain jacket, heavy rain gloves and nowadays also a twin umbrella. 


The rain gear dis not look very nice squeezing out from the gap between the passenger backrests....

So I added a black vinyl cover in there. (This picture is some years younger as you can see from the new seats.)

I glued the upper part of the vinyl in the trunk wall right behind the backrest. The lower part of the vinyl is held in place with Velcro on the back side of rear seat. (Here the vinyl was still being trimmed.)


Saturday, May 30, 2020

Adding switches

I started my switch project the easiest and most obvious way. I purchased the so called "Phoenix switch" which is originally made for the R1200 CL Phoenix model. This set of two switches bolts right on the right handlebar of the LT and if you don't need more this works fine.
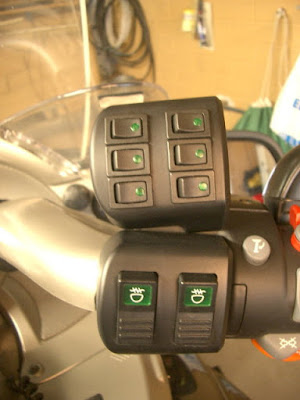
The original Phoenix switch is the one below. The one above is my modification when I needed more switches.
DISCLAIMER: All of the switches presented in this text and pictures command a relay and thus they all operate on low amps only. The original BMW Phoenix switches can (to my knowledge) command also directly lights or other higher amp devices, but in my bike all the small extra switches steer either a relay only or in some cases direct current to some low amp leds or similar.

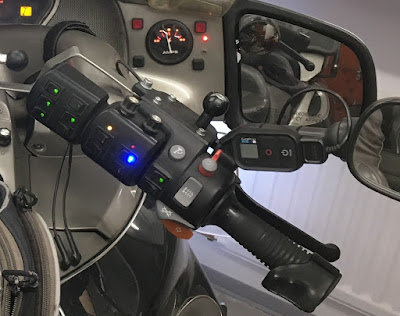
On my right side handlebar the switch set looks like this. The original BMW heavier switches are gone in both of these Phoenix sets. The one on the right side has the HeatTroller rheostat potentiometers mounted on the top and indicator leds in the front. The right one commands the grip heat and the left one riders seat heating.

This is how the package looks from behind. A lot of cables which are luckily thin. There is no way to pull heavier gauge cabling to these switches.

And here is how the two Phoenix switch housings are literally bolted together. There is only one "official" place for a single Phoenix housing so the second one has to be bolted on the side of the first one. 

Also the rear cover (base plate) of the second switch needs to be modified as the cover will be visible.
I simply filled the back side of rear cover with putty, sanded it smooth and painted black and now the back side of the second Phoenix switch is straight and smooth.

While I was at it I also added two switches in the OEM right side handlebar cover.

It was tight but there was enough space for these two.

And this is what the right side switch setup looks today after some 14 years and close to 200000 km. These automotive mini rocker switches are not originally made for bike use but they have worked Ok in my bike. They get wet during rain and sometimes when I wash the bike, but of course I never use pressure washer. And I add some electronics spray in the switches every now and then. 

On the left side the original switch is also doubled. The new one is from the older model LT and the four way ex-radio switch commands my seat height (up-down) and my backrest position (left-right). The lonely push button is for activating all my add-on electrical systems.


Tuesday, May 26, 2020

The famous Highway Handle


This farkle I invented already back in 2005. As most of LT riders know, you can ride the bike handsfree (without holding the handlebars) but you need to shift your weight slightly from side to side. And many have also tried this "handsfree mode" in too low speeds (i.e 60-70 km/h) WHICH YOU SHOULD NOT TRY. The famous wobble effect is at it's worst on those speeds.
I'm talking about speeds over 80 km/h, that is when you can ride an LT without holding the handlebars, which of course you can only do when the traffic allows this. And if you reach even your little finger to touch the handlebar you don't need to balance and "steer" the bike any more with your body balancing.
Anyway, I have an upper back problem and holding the handlebars with my both hands for a longer period of time gives me really nasty pain between my shoulder blades. This is always at its worst in the beginning of the riding season, even less than 100 km is too much.
So in order to relieve the upper back pain I started planning a system where I can sit more relaxed with my arms in my lap and still have a control on the bike's steering.
I developed the Highway Handle.

This was taken somewhere in Tennessee back in 2006 when we rode through 3 Canadian provinces and 19 US states in 2 weeks and the Highway Handle was really useful.

The handle is actually made from a telescopic Nordic Walking poles which are typically made of aluminium and you can adjust their length by pulling / pushing and then lock it by rotating the other part. The Nordic walking sticks  (or Hiking poles) can be found in most sport shops.

This is the part that is bolted in the extra holes that can be found in the LT handlebars. I have installed the K 1200 RS handlebar mirrors (which BTW are 100% better than the LT original mirros) and this piece bolts right on to the mirror's 8 mm threaded bolt. All the joints are tight enough so that Handle always stays in the position you leave it. It should not hang loose at any time. 
Here the handle is folded away.

Here it is in "short mode".

Here it is in fully extended mode.
Now, some people might consider this dangerous if not insane system. I remember one rider commenting this some 14 years ago by telling how he has been scuba diving, parachute jumping and water skiing but he would never ever dare to ride his bike with this kind of handle...

Oh well, each to his own. I have ridden with this about 200.000 km, I never use it in dense traffic. For instance on my numerous German trips I have very little use for this. On the contrary, on my several trips through the 49 states of US on Gold Wings or Harleys I always take my Highway Handle along and install it on the rental bikes. However on my last trip the shaking of H-D was too much for my Handle and I lost the adjustable part of it somewhere between Jacob Lake AZ and Kanab UT.

When you have open road in front of you, this is a one of my favorite farkles!


Shaping the dash


I started the dash reshaping back in 2006 and the current is my version 5.0


It all started from the need of adding some extra gauges. The first ones were the voltmeter and ammeter. Those were easy to install in the sides of the existing panel.

This was my cockpit version 1. I had the voltmeter on the left and ammeter on the right side. The tank bag was by BMW.


When I purchased the tire pressure monitoring system form SmarTire the only place for the display was on the left side under my voltmeter. After installiing I realized it did not work because the display was too far off from the direct line of sight. The LCD display was totally unreadable so it needed to be mounted  in the center of the dash. So I started planning an extension to the piece that is right under the windshield.


Here is my version nr 2 being prepared. I had already covered the "mistake" hole under the voltmeter as well as the dash light opening since I planned to replace that with some leds. There is one dash fastening screw hidden behind the original dash light. This I removed right away and have never missed it since...

Here is the start of reshaping the upper part. The opening in the center was for the tail of the quite long SmarTire display unit.

I used galvanized tight wire mesh which was quite easy to shape. On top of this I laminated fiberglass.
Fiberglass and putty added in order to maintain the "hump" of the center part.

It takes a lot of sanding and reapplying the putty...
But here it is ready painted.
And here is my cockpit version 2 ready. There is a radar detector fastened with Velcro on top. This was only used outside Finland as here it gets confiscated by the police plus a fine based on your income is applied.
The same with the led lights.
The version # 2 served me about a year until I needed some more gauges, engine oil and final drive oil temperature, and I had no place to install them. 
I started planning my version # 3 from a fresh upper panel which I purchased from somewhere. This time I did not use the wire mesh any more bu instead I used the standard perforated duct installation steel band. Note how the ends of the band were fastened in the wind deflectors since they were going to be integrated the same way as in my previous version.

For shaping the front part I used some stiff cardboard.

I started shaping the underside of the new dash at first. I used thinner stripes of cardboard and masking tape in order to make the contours making sure that my steel tape was visible on the edge so there was a surface for the fiberglass resin to fasten.

Laminating of the fibergalss was done. Next putty was needed.

Here putty was added and sanding was about done and the outline of the access hatch was drawn. It is important to leave access opening that you can connect your gauges, switches etc and the hatch is best to do in the underside of the new dash.

I used a hacksaw blade to cut the hatch.

The hatch needs to be fastened properly. Here I laminated a total of six nuts but in my later versions I went down to four screws only. Note that the top side of the dash is still missing, that can only be made after the hatch is ready in the underside. 

This is how the underside hatch and the led lights look like.
Here the topside has been laminated already.
And this is what you need the hatch for!
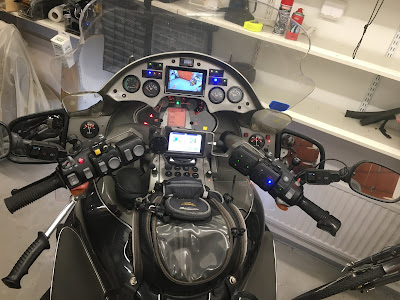
And here is my cockpit # 3 ready. I was able to fit the both oil temperature gauges, manifold vacuum gauge and the SmarTire display together with some switches in this dash. I later had to change the oil temperature gauges as the scale in  my original ones reached up to 150 deg C which was too high. The current ones (by VDO) reach to 100 C and those are ok.
I was happy with this cockpit version for a year until I realized that I need some more switches since more gadgets were added on the bike elsewhere. I also wanted to add lighting in the transparent wind deflectors. 


Here I drilled holes in the deflectors.

These were the orange leds that went inside the deflectors.


This is what lit looks like when lighted up. I also sanded the edge of the deflectors with #500 grid wet sandpaper.


One more detail of how to insert the end of the steel band in the defelctor.


Here the upper part was being shaped.
The front panel of corrugated board waiting for the fiberglass.


I call this my version 3.5 as it is pretty much the same as the previous one except more switches.


The version 3.5 served me from 2009 until 2012 until I got an inspiration of the oil pressure gauge and a display that would act as a monitor for my onborad cameras.

The upper dash got bigger in each version. The manufacturing process for my version 4 was the same as decribed before.


 The base for making this one I got from another LT rider who took my previous version and he gave me his stock piece to start from. In this picture I was already planning the version #5 since the screen I had in version 4 was too small and I was not completetly happy with the installation of it. I made the version 5 from this version 4 simply by redoing the face part as well as the underside.


So I found from somewhere in the Internet (probably China) a larger screen that came together with a reversing camera. Of course these cameras are not intended for weatherproof installation. The compartment inside my upper dash remains dry so I only had to seal the edges of the screen with black silicone and I also applied a screen protector on the screen and it has worked for a couple of years so far. 

 Looks like version 6 is still on the row because my long serving SmarTire tire pressure monitoring system has died out. The batteries in the pressure sensors inside the tires are dead after 15 years and some 180.000 km and the sensors are not made serviceable. Plus SmarTire has discontinued their motorcycle set altogether.
So I have ordered a new system which is still on the way to Finland and I need to remove the SmarTire display and replace it with the new one...