Tuesday, August 18, 2020

Strapping stuff on the bike and strapping the bike itself

As the "LT" is an abbreviation from "Light Truck" it is obvious that you occasionally end up hauling some extra stuff on your bike and then it would of course be nice if this is somehow planned in advance.

My first need for this came already during my first riding season back in 2005 when I was commuting to my that time office some 55 km away from home. Normally I had my work briefcase in the trunk where it fit perfectly. But quite often I got a message from my dear wife "why don't you bring some milk/yoghurt/cheese/whatever on your way home". Sometimes the shopping list was so long that I could not fit the stuff in the side bags. Especially when the side bags were already packed with bread since I happened to be working in a large bakery where fresh bread was regularly available...
Anyway, as a result of this the easiest way to arrange some more space for the odd milk and yoghurt cartons was to take my work case out from the trunk and tie it on the rear seat. 
So I made permanent straps that I can take out in seconds and fasten all kinds of things on the rear seat.


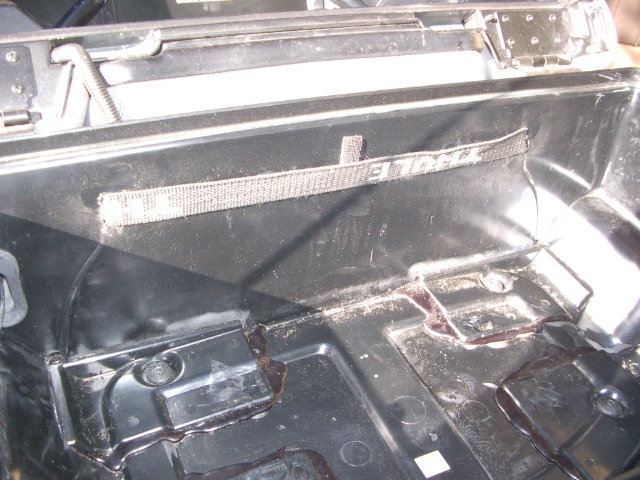
Here was my first strap. I simply cut long vertical openings in the front wall of the trunk to fit a long enough strap that goes through them. (Note: the trunk liner is of course removed before making the holes!)

Here the strap ends come out.


And here the strap ends are rolled in out of the way.


And here my work bag was tied on the rear seat. 


Soon I realized that I needed also tie points from other direction for some different kind of bags. Using the side case handles would have been the straight forward way to go but this would not work if you need to have access to the side cases as well.

For my USA trip back in 2006 I was going to have a RKA rack bag permanently tied down on the rear seat. I was saving the trunk rack for some ad hoc tie down needs.

So I simply took a proper length of strap and fastened it under the rear seat with screws. I made loops in both ends of the strap.
...like this. These loops are normally out of way and will not bother closing the side bags.


And my RKA bag stayed in place like this. In the bag I kept my larger camera, and large thermos bottles with ice and Kool-Aid. 

The straps that I used on this USA trip were long enough so that the ends would reach down inside the side case. This way stealing the case would need the straps to be cut at first. Luckily our that time trip took us to no such neighborhoods where even worrying about this was no issue.


Sometimes I need a different shape of bag on the rear seat:

This is a Chicane rack bag for LT.(Unfortunately no longer available other than used ones occasionally on certain forums.)


I sewed loops in the bottom of the Chicane bag and through them I can lock the bag on the rear seat when I'm riding solo. 


...like this. These straps with plastic locks are taken from old bicycle helmets.


Then how to strap the bike on trailers, ferries, trains etc...?

Back in 2006 when me and my travel buddy Jouko were preparing our bikes for their flights over the Atlantic (Frankfurt-Calgary and Toronto-Frankfurt) we found this set mady by German Wüdo. It was made specially for an LT. (Later we learned that when a bike is tied down on an air cargo pallet they only use their own air cargo rated straps and belts and they could care less about our own straps.)


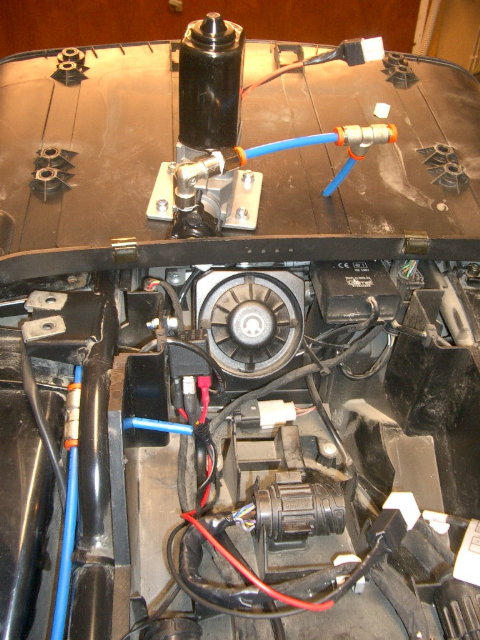
Anyway, this is the Wüdo piece that goes between the front forks.

Here the piece is upside down. The cavity in the middle occupies the plastic covered center nut between the forks.


...like this. As I said the guys in the air cargo we not interested in using this and during the past 15 years I have needed this only once when I hauled the bike in wintertime half stripped on a trailer to have the brake lines changed.

These also came with the Wüdo set. As you can see from the scratches these have been used a lot. Every time on a ferry I use these for keeping the bike in place. 

Since the above described Wüdo sets are probably no longer available or if they are,they are quite pricey, I have developed a simple replacement for the side fixing point. Here is the recipe:
1. Take out the upper bolt that holds the pillion foot peg plate.

2. Take a 8 mm (stainless steel) ring bolt and approriate amount of 8 mm washers. (You can get these at least from a boat store in case your local hardware store does not carry these.)  

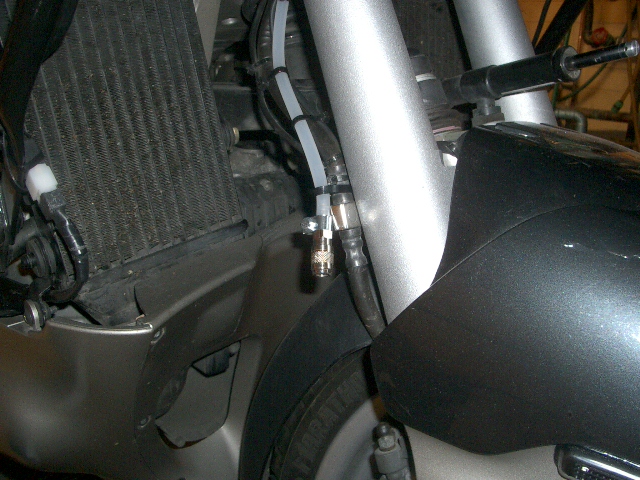
3.Replace the original allen bolt with this new ring bolt.
4. When you need to strap your bike down, place these hooks (fire safety hooks....? in English) on your ring bolt so now you have space for heavier straps.
5.You can leave your ring bolts in place permanently.

These parts were purchased from the boat department of a Swedish hardware chain "Biltema". In case some of you have this store within reach.


Monday, August 17, 2020

The hitch and what is hanging on it

 Already back in 2005-2006 I started planning some kind of additional luggage rack for our longer trips. So started searching for some trailer hitches as I figured that is a good starting point for fixing the luggage rack on the bike. I had seen them on GoldWings but at that time there were none available for LT's.

Somehow I spotted an ad either on eBay or BMWLT.com classified about a used Dauntless LT trailer hitch for sale. The seller was kind enough to ship it all the way to Finland and to my pleased surprise this hitch was already equipped with a square receiver tube instead of the regular hitch ball. At that time I was not in favor of purchasing a trailer.


Here is the hitch itself. The previous owner had installed a plastic mud flap extension on the Dauntless tubes and as this seemed to work well with preventing the water from spraying all over I left this in place.The receiving tubes (with plastic caps) are already installed in the bike. The  power socket can be seen on the right. Unfortunately I don't have a picture of the set before installation but if you make a Google search with "dmc trailer hitch K 1200 LT" you will get plenty of pictures. You can also try with the older brand name "dauntless trailer hitch K 1200 LT"


Here is a good side view of my Dauntless (later DMC) hitch and receiver in place. That summer I also had the Remus exhaust pipe for 2 months. Until I got fed up with the rumble it made at typical touring speeds of 100 km/h...
What I like with this Dauntless /DMC hitch is that it is easy to remove when not used and leaves the bike looks practically intact.

As in every project, proper planning is half of the success. So I started making some 3D-sketches of my rack with my AutoCad...


This was my final design of the rack. The bike parts (rear tire, exhaust, trunk) are pretty simple as you can see...;-)


Here was the frame.


This described the Delsey suitcase I was planning to mount on the rack. Since the weight of the bag could be up to 20 kg I needed the cables that would give support from the top as well.


And here was the ready version 1.0. (I later replaced the cable fastening with different system so that I could avoid using the spreading bar.) I added an extra brake light and side marker lights to the rack since the power for these was easy to get from the power socket that came with the hitch.
The rack frame was not built by me but by an associate stainless steel professionals who build bakery ovens as their daily business.

I even had a 12 V fridge/cooler that would fit on the rack. To be honest I never really used it though...


Later I modified the upper fastening points in such way that I could avoid using the "spreading bar" for the cables as this was pretty much on the way of removing and putting in place of the Delsey bag.

I designed a "V-shaped" steel bar out of a 5 x 30 mm flat steel.
...like this, I made 10 mm threaded holes and welded U-shaped hooks at the ends of the V-bar.


The V-bar is fastened of these steel bars that were originally made for relocating the trunk 30 mm further backwards from the factory rear position.  You can read that story here

And here is a close-up of how the bar is fastened on the bike.


And this is what the hitch rack looks like from the side. I had a black vinyl cover / hood made for the Delsey flight bag. This protects the bag from rain etc. BTW, when I had the Remus exhaust (without the catalytic converter) for the one summer, it contaminated the bag with very heavy exhaust fumes smell. When I returned back to the OEM exhaust this problem was mostly gone.

And this is from another angle. The extra weight in the tail can be noticed but it is not too bad. About the same as my Uni-Go is giving...

Below some detail pics of the cable supports.

The rack side fastening points are "telescopes"...


...like this. They can be pulled out in case a wider bag must be fitted on the rack.


I used the stuff from a boat shop for my cable fastening and tightening,


This is the top fastening (bad photo, sorry...)

This story continues later with the Uni-Go as I finally decided to purchase one back in 2010. 


Thursday, August 13, 2020

Air compressor on board

This modification which I made back in 2005 is probably a bit outdated today as there are nice and small USB chargeable compressors available. But I figured I needed this. During the past 15 years I have used this a couple of times but never in real emergency. I have more assisted the others than needed it myself.

Anyhow, I started searching for the right kind of small and powerful enough compressor. Thomas seemed to be the brand that was widely used by other bikers. These compressors are used for instance in truck air seats and such.

The picture below shows a simple portable solution that was made by another LT rider. This would work just as well but "of course" I wanted to go a bit further and integrate the system in the bike and thus save some luggage space.


Here was the space in which I was planning to install the compressor. Luckily the European LT:s did not have the emission canister stealing the space and requiring the famous "canisterrectomy" to be done at first. The heavy (2,5 mm2) cables with the white connector are the power feed for the compressor.
Here you can see how I installed the compressor. It is actually hanging from the plastic cover / lid that is between the trunk and this compartment. The plastic lid is flipped upside down in this picture.

Here the compressor is hanging from the lid and the lid is about to be installed in place.This picture also shows my pressurized 6 mm air pipeline that I pulled through the bike. The pipe going upwards from the T-connector goes to my air pressure gauge...

...like this. The red button is the compressor start button. The compressor is powered by a relay so only a thin pilot current cable is needed for the button.

The pressure gauge.


I have a rubber hose that I keep inside the right saddle bag lid. (Note my first generation side case interior lights.)

This hose connects to the two quick connectors I installed. One in the rear panel of the bike.


And the other connector I installed next to the front fork.

Like this...

And the tail connector.

Some words of learning over the years:
- The female quick connectors on the bike must be covered or taped properly. Water/dust/sand gets in the connectors otherwise and the hose male connector does not fit properly as a result of this. Another problem can be that the connector does not close completely when disconnected. This is a major problem if you want to fill your front tire and the air leaks out from the rear quick connector! At first I used a rubber "plug" that was not tight enough but nowadays I simply tape the connectors completely and whenever I need the air I cut the tape off.
- The other issue I once encountered when helping out a fellow biker with a completely flat tire. I kept the compressor running for too long. The unit gets hot and so does the air that comes out from it. The plastic pipe closest to the compressor got too hot and of course blowed up. That was the end of that assistance. .So nowadays I run the compressor in max 3 min intervals and then let it cool off a minute or two in between.