The trunk of the K 1200 LT has at least three points that seem to be bothering the owners by breaking down.
Those points are the vanity mirror, the strap fixing point and the trunk latch. I have also seen one case where the hinges have been broken but I really don't know how that has happened so it is hard to offer any fixing to that issue.
Let's start from the easiest improvement.
The original length of the lid strap is too long. It allows the trunk lid to open too far towards front. If you lose your grip of the lid when opening it and it "falls open" freely, in many cases the fixing point of the strap in the trunk base breaks down. This is because the lid is rather heavy and gains momentum when falling freely open.
 |
| This is the fix! |
 |
| Simply fold the strap again and make another loop so that the strap becomes slightly shorter. If you are not comfortable with needle and thread ask your better half to assist! |
 |
| So that the your lid opens slightly over 90 degrees, enough to stay open by itself but not enough for it to gain enough momentum to break the aluminum lower fixing point. |
Probably the most common failure of the LT trunk is the broken vanity mirror hinge. The mirror is held up by a magnet and if you ride your bike to a bump with empty trunk and there is no support from the luggage, the mirror flips open and quite often breaks the plastic hinge. I broke mine quite early and got a replacement under warranty from the dealer. I figured that these will not be handed over to me on annual basis so something needed to be done.
 |
I added a stretch band that my wife donated to me and fastened it with boat canvas fasteners.
|
 |
| Here is a better view of the canvas fastener and in the same picture you can see my one 12 V power socket with USB converter. |
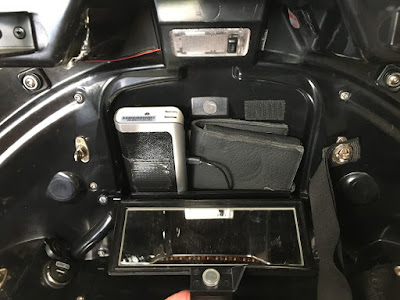 |
| This shows what I have hidden behind the mirror cover. My bike being bought in 2004 it still had the nice leather folder for the bike documents. This you can see on the right. The gadget on the left is my power bank. This has enough power to jump start the bike in case the bike battery is dead. Here you can also see that I had to trim some plastic off of the lid since in order to fit the power bank in place. |
 |
| Here is the power bank. In the bottom of the storage box I have one more 12 V outlet with USB charger to keep the power bank charged. |
 |
| Here is the bottom of the storage box with the USB charger. |
In the front wall of the trunk I have a storage space for my first aid kit and the other bag holds the rain cover for my Russell leather seats.
 |
| Like this. Another donation from my wife holds these things in place.... |
 |
| ..together with a thin aluminium L-profile that makes a bottom support for the items. |
The third and most expensive problem with LT trunk is the syndrome of the broken latch. The latch can break when you have slightly overfilled your trunk and then you try to close it by applying extra force to the latch. The material of the latch is some kind of "cheap metal" which is very difficult if not impossible to fix. From the dealer the only fix is to buy the complete trunk lid assembly. Not cheap...
There were two aftermarket kits available for the LT trunk latch. One set for reinforcing the existing mechanism "Fix It Before It Breaks" and the other one to replace the already broken latch. Unfortunately the site LT Trunk Latch.com no longer exists and the manufacturer Evan Guy sold out all his sets already back in 2017.
 |
| These were the parts for the "Fix-It-Before-It-Breaks" set. |
 |
| And this is how they looked after installation. I have had this set since 2009 and it really works. |
However, there is a simple pre-emptive measure that can be done in order to make the latch breakage less probable.
From the factory the locking mechanism has both steel pins and steel hooks to pull down the lid. You can hear the unpleasant scraping sound of the metal against metal when closing it.
What I did already years before purchasing the latch kit above was to add plastic tubes around the pins of the lid lock counter piece.
 |
| The tube that I used was the harder type pneumatic plastic pipe. Inner diameter accorsing to the pin...5 or 6 mm if I remember correct. |
 |
| Since the counter piece (pin) diameter increases you must grind off 1-2 mm from the locking hooks. Otherwise locking the lid applies excessive pressure to the locking mechanism and also grinds a groove in your new plastic axle in no time. In my bike I have changed the plastic shaft covers maybe 2 times during the past 200000 km. |
While I was improving my trunk I decided to add some lighting to it. This was simple with a led strip with adhesive.
 |
| I simply stole the 12 volts from the OEM trunk light. |
 |
| This picture shows my rain gear storage which is between the backwards relocated trunk and the passenger seat. The passenger backrest needed to be moved upwards some 20 mm in order to have access to this new space. (See it here) |


I'm impressed....
ReplyDelete